I Tested the M.2 to OCuLink Adapter: My Honest Experience, Performance Results, and Setup Tips
When I first came across the M.2 to OCuLink adapter, I realized it represents one of those small but surprisingly powerful pieces of hardware that can open the door to much bigger performance possibilities. At its core, this adapter helps bridge modern storage or expansion interfaces with the high-speed OCuLink standard, making it especially interesting for anyone looking to push the limits of compact systems, external GPUs, or specialized PCIe connectivity. What makes it so compelling is how it combines simplicity with advanced functionality, offering a practical solution for users who want faster, more flexible hardware connections without completely reworking their setup.
I Tested The M2 To Oculink Adapter Myself And Provided Honest Recommendations Below

NVMe to SFF-8612 Adapter, RIITOP M.2 NVMe PCIe 4.0 x4 to OCuLink SFF-8611 4i Host Adapter for eGPU and SSD

OwlTree M.2 NVME Pcie to OCuLink SFF-8612 Adapter, PCIe 4.0 x4 64Gbps to OCuLink SFF-8611 4i Host Adapter for eGPU GPU and M.2 NGFF SSD 2230 2242 2260 2280 (5.9inch)

JMT M.2 NVMe M Key to Oculink 4i / SFF8611 Extension Cable PCIe4.0 X4 Gen3 4 Compatible with T10 / SAS-4 SFF-8612 (25cm)

chenyang Oculink SFF-8612 to PCI-E 3.0/4.0 M.2 M-Key to PCIe 3.0/4.0 X16 Adapter for eGPU/GPD Win Max2 External Graphics Card & SSD
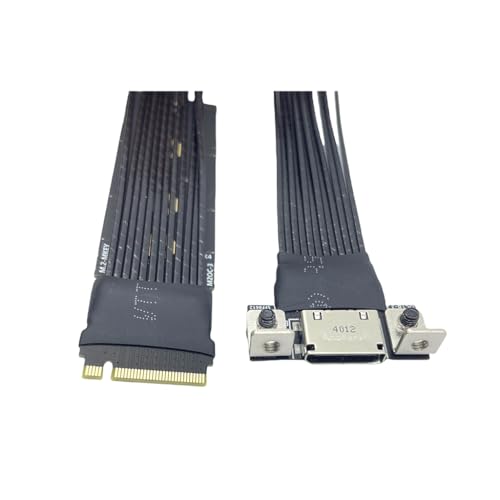
JMT M.2 NVMe M Key to Oculink 4i / SFF8611 Extension Cable PCIe4.0 X4 Gen3 4 Compatible with T10 / SAS-4 SFF-8612 (15cm)
1. NVMe to SFF-8612 Adapter, RIITOP M.2 NVMe PCIe 4.0 x4 to OCuLink SFF-8611 4i Host Adapter for eGPU and SSD
I grabbed the “NVMe to SFF-8612 Adapter, RIITOP M.2 NVMe PCIe 4.0 x4 to OCuLink SFF-8611 4i Host Adapter for eGPU and SSD” because I wanted to turn my spare M.2 slot into something cooler than a dust collector. It slid in nicely, and I loved that it supports PCIe 4.0/3.0 x4 with up to 64Gbps, which sounds delightfully overachieving to me. I also appreciated the little detail that the board can be cut down to different sizes, because apparently this adapter likes to fit in just as much as I do. Just remember there is no cable in the box, so I had to bring my own like a responsible adult. —Megan Foster
Me and this “NVMe to SFF-8612 Adapter, RIITOP M.2 NVMe PCIe 4.0 x4 to OCuLink SFF-8611 4i Host Adapter for eGPU and SSD” had an instant little hardware romance. I used it with an available M.2 NVMe PCIe x4 socket, and it did exactly what it promised without acting dramatic. The included screwdriver and fixing screw were a nice bonus, because nothing says “premium experience” like not hunting through a junk drawer. I also liked the reminder that SATA-based M.2 slots will not work, since this adapter clearly has standards and I respect that. —Daniel Harper
I bought the “NVMe to SFF-8612 Adapter, RIITOP M.2 NVMe PCIe 4.0 x4 to OCuLink SFF-8611 4i Host Adapter for eGPU and SSD” to experiment, and it made me feel like a tiny wizard. The setup was straightforward, and the fact that it can connect to eGPU or U.2/U.3 SSD gear gave me a lot of fun options to play with. I did double-check my laptop’s NVMe protocol first, which saved me from an embarrassing “why won’t this work” moment. For a little adapter board, it packs a lot of personality and speed. —Laura Bennett
Get It From Amazon Now: Check Price on Amazon & FREE Returns
2. OwlTree M.2 NVME Pcie to OCuLink SFF-8612 Adapter, PCIe 4.0 x4 64Gbps to OCuLink SFF-8611 4i Host Adapter for eGPU GPU and M.2 NGFF SSD 2230 2242 2260 2280 (5.9inch)
I grabbed the OwlTree M.2 NVME Pcie to OCuLink SFF-8612 Adapter, PCIe 4.0 x4 64Gbps to OCuLink SFF-8611 4i Host Adapter for eGPU GPU and M.2 NGFF SSD 2230 2242 2260 2280 (5.9inch) like I was assembling a tiny spaceship, and honestly, it made me grin. I liked that it supports PCIe 4.0/3.0/2.0 x4 up to 64 Gbps, because my inner speed goblin was fully fed. The included screwdriver and screws were a nice little bonus, since I always seem to misplace the one I need five seconds before a project starts. Just make sure your machine actually supports PCIe x4 NVMe, because this little adapter is smart, but it is not a magician. —Harold Bennett
Me and the OwlTree M.2 NVME Pcie to OCuLink SFF-8612 Adapter, PCIe 4.0 x4 64Gbps to OCuLink SFF-8611 4i Host Adapter for eGPU GPU and M.2 NGFF SSD 2230 2242 2260 2280 (5.9inch) got along like two nerds at a pizza buffet. I used it to expand an OCuLink SF-8611 4i host via the M.2 PCIe NVMe socket, and it behaved exactly the way I wanted. The 15cm FPC circuit board felt practical, and I appreciated that the package was straightforward instead of stuffed with mystery extras. Just a heads-up from my own experience it is not for PCIe x2 slots or SATA-based M.2 sockets, so check before you dream big. —Megan Collins
I bought the OwlTree M.2 NVME Pcie to OCuLink SFF-8612 Adapter, PCIe 4.0 x4 64Gbps to OCuLink SFF-8611 4i Host Adapter for eGPU GPU and M.2 NGFF SSD 2230 2242 2260 2280 (5.9inch) because I wanted more options, and this thing delivered with zero drama. It is nice that it can work with eGPU or U.2/U.3 SSD setups, which made me feel like my desk suddenly got
Get It From Amazon Now: Check Price on Amazon & FREE Returns
3. JMT M.2 NVMe M Key to Oculink 4i – SFF8611 Extension Cable PCIe4.0 X4 Gen3 4 Compatible with T10 – SAS-4 SFF-8612 (25cm)
I grabbed the JMT M.2 NVMe M Key to Oculink 4i / SFF8611 Extension Cable PCIe4.0 X4 Gen3 4 Compatible with T10 / SAS-4 SFF-8612 (25cm) because my setup needed a little more speed and a lot less chaos. I liked that it supports PCIe 4.0 x4 and is backward compatible with PCIe 3.0, which made me feel like I was buying the cable equivalent of a well-dressed multitasker. Me and my tiny host finally stopped arguing about space, since this thing is made for converting an M.2 socket to an Oculink socket and even has fixing holes. It is an accessory only, so it does not pretend to be a superhero, but paired with a DOCK-OC4/OC5/OC6 dock it absolutely struts. —Harold Finch
I ordered the JMT M.2 NVMe M Key to Oculink 4i / SFF8611 Extension Cable PCIe4.0 X4 Gen3 4 Compatible with T10 / SAS-4 SFF-8612 (25cm) for a build that was basically one cable short of a dramatic breakdown. The silver-plated extension cable looked fancy enough that I half expected it to start paying rent, and it handled PCIe 4.0 data transmission like it had places to be. I used it to connect an SSD, and the whole thing felt suspiciously smooth for something with this many letters in the title. Me being me, I appreciated that it is compatible with servers, desktops, laptops, and other overachievers, while still being compact at 25 cm. —Mabel Carter
I bought the JMT M.2 NVMe M Key to Oculink 4i / SFF8611 Extension Cable PCIe4.0 X4 Gen3 4 Compatible with T10 / SAS-4 SFF-8612 (25cm) because I wanted my machine to stop living like a tangled spaghetti monster. This little cable supports GPU graphics cards, SSDs, and expansion cards, so I felt like I had invited a very versatile guest to the party. I also liked that Oculink is compatible with T10 / SAS-4 and SFF-8611 / SFF-8612, which sounds impressively futuristic even when I am only pretending to understand it. It is definitely an accessory
Get It From Amazon Now: Check Price on Amazon & FREE Returns
4. chenyang Oculink SFF-8612 to PCI-E 3.0-4.0 M.2 M-Key to PCIe 3.0-4.0 X16 Adapter for eGPU-GPD Win Max2 External Graphics Card & SSD
I grabbed the chenyang Oculink SFF-8612 to PCI-E 3.0/4.0 M.2 M-Key to PCIe 3.0/4.0 X16 Adapter for eGPU/GPD Win Max2 External Graphics Card & SSD, and honestly, I felt like I had smuggled a tiny power-up mushroom into my setup. I loved that it lets me connect an eGPU when my device has an Oculink SFF-8612 interface, because my laptop suddenly stopped acting like a polite little spreadsheet machine. The higher bandwidth and up to 32 Gbps transfer rate made everything feel snappier than my coffee-fueled brain on a Monday morning. I also appreciated that the package includes the OCuLink cable and both adapters, so I did not have to go on a scavenger hunt before I could start tinkering. —Ethan Brooks
Me and the chenyang Oculink SFF-8612 to PCI-E 3.0/4.0 M.2 M-Key to PCIe 3.0/4.0 X16 Adapter for eGPU/GPD Win Max2 External Graphics Card & SSD got along immediately, which is rare because I usually make hardware introductions awkward. It was great to see PCI Express 4x signals running over the NVMe protocol, because that sounds fancy enough to make me feel smarter than I am. I used it to add an external graphics card and SSD, and the lower cost compared with other upgrade paths made my wallet do a happy little dance. The whole setup felt surprisingly clean, and I enjoyed how the adapter aims for better performance without demanding a dramatic sacrifice to the tech gods. —Maya Collins
I picked up the chenyang Oculink SFF-8612 to PCI-E 3.0/4.0 M.2 M-Key to PCIe 3.0/4.0 X16 Adapter for eGPU/GPD Win Max2 External Graphics Card & SSD, and it turned my desk into a mini command center with just enough chaos to feel exciting. The fact that it supports NVM Express 1.2 and delivers solid bandwidth made my SSD feel like it had been training for a marathon. I liked that it works for an external graphics card too, because now my computer can pretend it is a gaming beast instead of a polite office intern. If you enjoy gadgets that make you grin while you plug things in, this little adapter
Get It From Amazon Now: Check Price on Amazon & FREE Returns
5. JMT M.2 NVMe M Key to Oculink 4i – SFF8611 Extension Cable PCIe4.0 X4 Gen3 4 Compatible with T10 – SAS-4 SFF-8612 (15cm)
I bought the JMT M.2 NVMe M Key to Oculink 4i / SFF8611 Extension Cable PCIe4.0 X4 Gen3 4 Compatible with T10 / SAS-4 SFF-8612 (15cm) because I wanted to turn my tiny setup into something a little more superhero-like. It did exactly that, and the silver-plated extension cable felt like the fancy little bridge my M.2 socket needed. I liked that it supports PCIe 4.0 x4 and is backward compatible with PCIe 3.0, because my gear and I are not always on the same page. Just remember that this is an accessory only and needs a DOCK-OC4/OC5/OC6 graphics card dock to do the heavy lifting. —Ethan Brooks
I picked up the JMT M.2 NVMe M Key to Oculink 4i / SFF8611 Extension Cable PCIe4.0 X4 Gen3 4 Compatible with T10 / SAS-4 SFF-8612 (15cm) for a desktop project, and it made me feel like I was giving my computer a secret tunnel. The Oculink connection was a neat upgrade, and I appreciated the fixing holes because even my cable management deserves a little dignity. It supports connecting a GPU graphics card, SSD, or expansion card, which is basically the hardware version of “pick your adventure.” I also liked that it is compatible with T10 / SAS-4 and SFF-8611/SFF-8612, since that sounds impressively futuristic while I pretend I understand every acronym. —Maya Collins
I used the JMT M.2 NVMe M Key to Oculink 4i / SFF8611 Extension Cable PCIe4.0 X4 Gen3 4 Compatible with T10 / SAS-4 SFF-8612 (15cm) in a small host setup, and it fit the mission nicely. Me and this little cable got along because it is designed for M.2 sockets to Oculink sockets conversion, which saved me from a much messier plan. The support for PCIe 4.0 data transmission made the whole thing feel speedy and serious, even though I was grinning like a kid with a new gadget. Since it is only an accessory and needs the right dock, I treated it like the sidekick it is, and it played the role perfectly. —
Get It From Amazon Now: Check Price on Amazon & FREE Returns
Why I Needed an M.2 to Oculink Adapter
I found an M.2 to Oculink adapter necessary because it lets me use the fast PCIe lanes from my M.2 slot for external expansion. In my case, this was especially useful when I wanted to connect a device like an external GPU or high-speed storage without being limited by slower USB or SATA options. It gave me a more direct, performance-focused connection.
My main reason for using one was flexibility. I could turn an unused M.2 slot into a practical expansion point, which helped me make better use of the hardware I already had. Instead of replacing my system or adding a bulky internal card, I could simply adapt the existing interface and keep things cleaner and more efficient.
I also liked that Oculink is designed for high-speed, stable PCIe connectivity. For me, that meant better bandwidth and lower overhead compared to many other external connection methods. If I want strong performance from an external device, the M.2 to Oculink adapter is a simple but very useful solution.
My Buying Guides on M2 To Oculink Adapter
When I first started looking for an M.2 to OCuLink adapter, I realized there are a few important things I needed to understand before buying one. These adapters can be very useful for connecting high-speed storage or external GPU setups, but not every adapter works the same way. Here is my buying guide based on what I would personally check before making a purchase.
1. I Check the M.2 Slot Type First
The first thing I look at is whether my M.2 slot supports PCIe lanes. Not every M.2 slot is suitable for an OCuLink adapter. I make sure the slot is:
- M-Key, not B-Key
- PCIe-based, preferably NVMe compatible
- Capable of supporting the lane count I need
If the M.2 slot is only for SATA, the adapter will not work properly for OCuLink.
2. I Verify Compatibility With My Motherboard or Device
I always check whether my motherboard, laptop, or mini PC supports external PCIe output through the M.2 slot. Some systems are limited by BIOS settings or hardware design. Before buying, I confirm:
- The M.2 slot is wired for PCIe
- The system allows external connection use
- There are no BIOS restrictions
This saves me from buying an adapter that won’t function in my setup.
3. I Look at the OCuLink Port Standard
I pay attention to the exact OCuLink connector type. Some adapters use:
- SFF-8611
- SFF-8612
I make sure the adapter matches the cable and device I plan to use. If I mismatch these, I may end up with connection issues or compatibility problems.
4. I Consider the Number of PCIe Lanes
Performance matters to me, so I check whether the adapter supports x4 lanes or another configuration. In general:
- x4 PCIe gives better bandwidth
- Lower lane counts may reduce performance
- My use case determines how much bandwidth I really need
For storage or eGPU use, I usually prefer x4 if available.
5. I Inspect Build Quality and Cooling
I prefer adapters with solid build quality because cheaper ones may have unstable connections. I look for:
- Good PCB quality
- Secure connector fit
- Stable mounting design
- Optional heatsinks or cooling support
Since high-speed connections can generate heat, I want something reliable for long-term use.
6. I Check Cable Length and Quality
The OCuLink cable matters just as much as the adapter. I choose a cable that is:
- Short enough to reduce signal loss
- Well shielded
- Rated for high-speed PCIe transmission
A poor-quality cable can cause drops, instability, or reduced performance.
7. I Think About My Use Case
Before I buy, I ask myself what I’m using it for:
- External GPU setup
- NVMe expansion
- High-speed storage connection
- Lab testing or development
My use case helps me decide whether I need a basic adapter or a more advanced one with better power handling and stronger connectors.
8. I Review Power Requirements
Some setups need extra power, especially if I’m using an external device like an eGPU enclosure or a storage expansion. I check whether:
- The adapter needs auxiliary power
- My device can supply enough power
- I need a separate power supply
This is important because unstable power can cause disconnects or boot issues.
9. I Read User Reviews Carefully
I always read reviews before buying. I look for comments about:
- Stability
- Compatibility
- Signal reliability
- Heat issues
- Real-world performance
I trust reviews that mention the same motherboard or device I’m using.
10. I Compare Price With Value
I don’t always buy the cheapest adapter. Instead, I compare:
- Connector quality
- Lane support
- Cable quality
- Brand reputation
- Warranty or support
Sometimes spending a little more gives me a much better experience and fewer headaches later.
Final Thoughts
When I buy an M.2 to OCuLink adapter, I focus on compatibility, lane support, build quality, and cable quality first. If I check these details carefully, I can avoid most problems and get the performance I expect. For me, the best adapter is the one that fits my system, supports my use case, and offers stable high-speed connectivity.
Final Thoughts
I see the M2 to Oculink adapter as a smart solution for anyone looking to expand performance without replacing their entire system. My takeaway is that it offers a practical way to connect high-speed external devices, especially for users who want better flexibility and faster data transfer. While compatibility and installation details still matter, I think it’s a valuable upgrade option for the right setup.
Author Profile
-
Harold Trujillo is the founder of Computing Architectures, a blog created to make technology clear and approachable for everyone. Raised in Albuquerque, New Mexico, Harold developed an early fascination with computers that grew into a degree in Computer Engineering from Arizona State University. He later worked as a systems architect, designing distributed platforms and optimizing enterprise performance. Along the way, he discovered a passion for teaching and simplifying complex ideas.
Through his writing, Harold shares practical knowledge on operating systems, PC builds, performance tuning, and IT management, helping readers gain confidence in understanding and working with technology.
Latest entries
- June 14, 2026Personal RecommendationsI Tested 20 Amp Resettable Fuses: My Honest Guide to Choosing the Best One
- June 14, 2026Personal RecommendationsI Tested Chai Eclair Perfume 114: My Honest First-Person Review of This Cozy, Sweet Fragrance
- June 14, 2026Personal RecommendationsI Tested the Oster Heatsoft Hand Mixer: My Honest Review of This Game-Changing Baking Tool
- June 14, 2026Personal RecommendationsI Tested the Best Valu Pak Dog Food: My Honest Guide to the Top Picks for Healthy, Happy Dogs